This post may contain affiliate links. If you make a purchase through these links, we may earn a commission at no additional cost to you.
A kitchen stays busy in December, with baking projects, holiday meals, and guests wandering through for coffee.
Decorations have to earn their counter space without getting in the way of actual cooking.
The most useful Christmas kitchen decor works at the edges of the room: along backsplashes, above the range, on cabinet fronts, at the end of the island, and around the sink window.
These ideas lean on trays, narrow shelves, vertical surfaces, and pieces that can be wiped or lifted away quickly.
Use them as a placement and composition guide, then adjust to fit the way the household actually moves through the room.
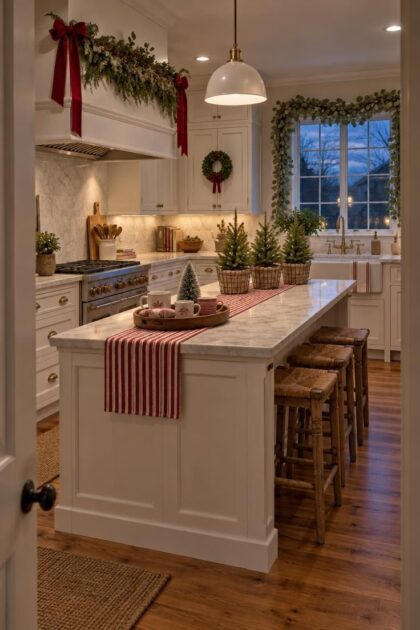
Mini Evergreen Trio in Wire Baskets on the Island End
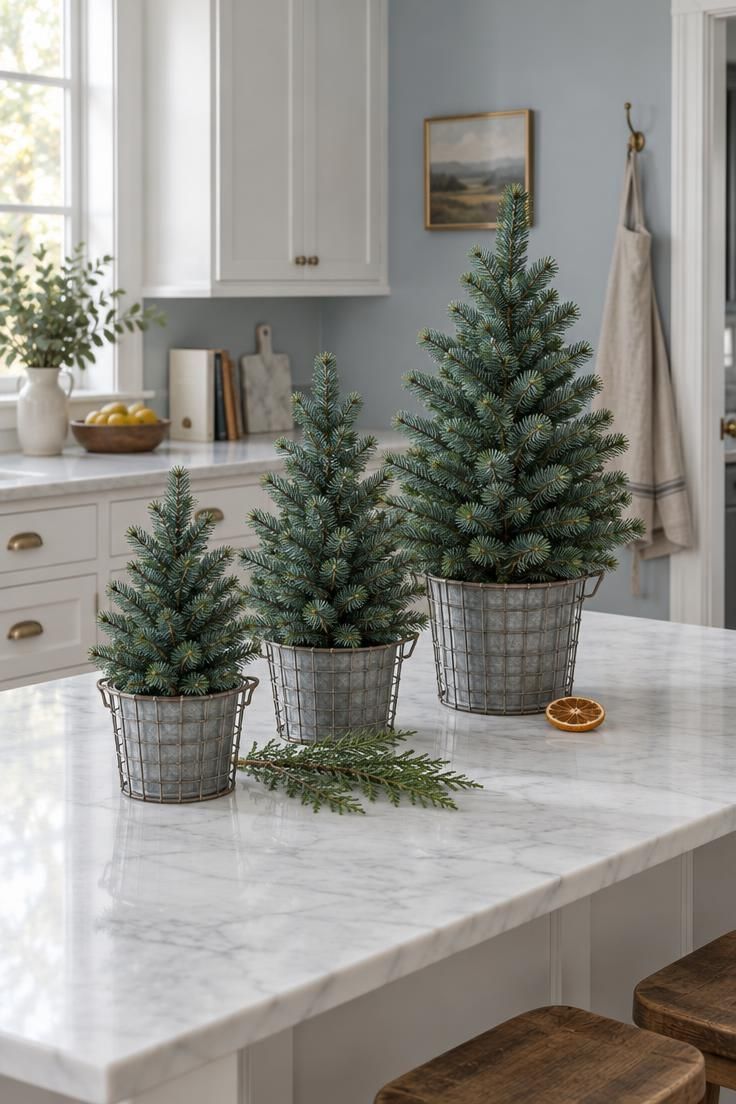
Three small evergreens grouped at the island end give the kitchen a holiday anchor without touching the prep area.
Vary the heights so the foliage reads as one cluster, and keep the baskets plain so the arrangement looks deliberate rather than decorated.
Faux trees suit a working kitchen because they need no watering and drop no needles near food.
Position the trio 8 inches or more from the island's edge so elbows do not sweep the baskets during meal prep.
Check that the cluster does not block a drawer pull, an outlet, or the walkway around the island.
On a narrow island, choose the end farthest from the sink and keep the pots close to the corner.
Dust settles into faux foliage quickly in a kitchen.
A quick pass with a soft brush or a vacuum brush attachment on a weekly schedule keeps the arrangement looking crisp.
Baskets can be wiped with a damp cloth.
Texture matters here.
Wire baskets against full needles create contrast, while a smoother or taller basket would compete with the shapes of the trees.
A single dried citrus slice or a small wooden star tucked among the branches adds a seasonal touch without crowding the trio.
Scale is the deciding factor.
Trees under about 8 inches disappear next to a full-size island, while a single tall tree on a small island becomes a barricade.
A trio in graduated sizes occupies roughly a foot of linear space, so measure the available end zone before buying.
Storage is straightforward: the baskets nest and the trees wrap in tissue or a bag.
Labeling the box by room makes next December easier.
Style Blueprint:
- Three faux evergreens in graduated heights between roughly 8 and 16 inches
- Simple galvanized wire baskets with no ornament fill
- A dried citrus slice or cedar sprig as a single finishing detail
- A soft brush kept nearby for weekly dusting
Layered Greenery Swag on a White Range Hood
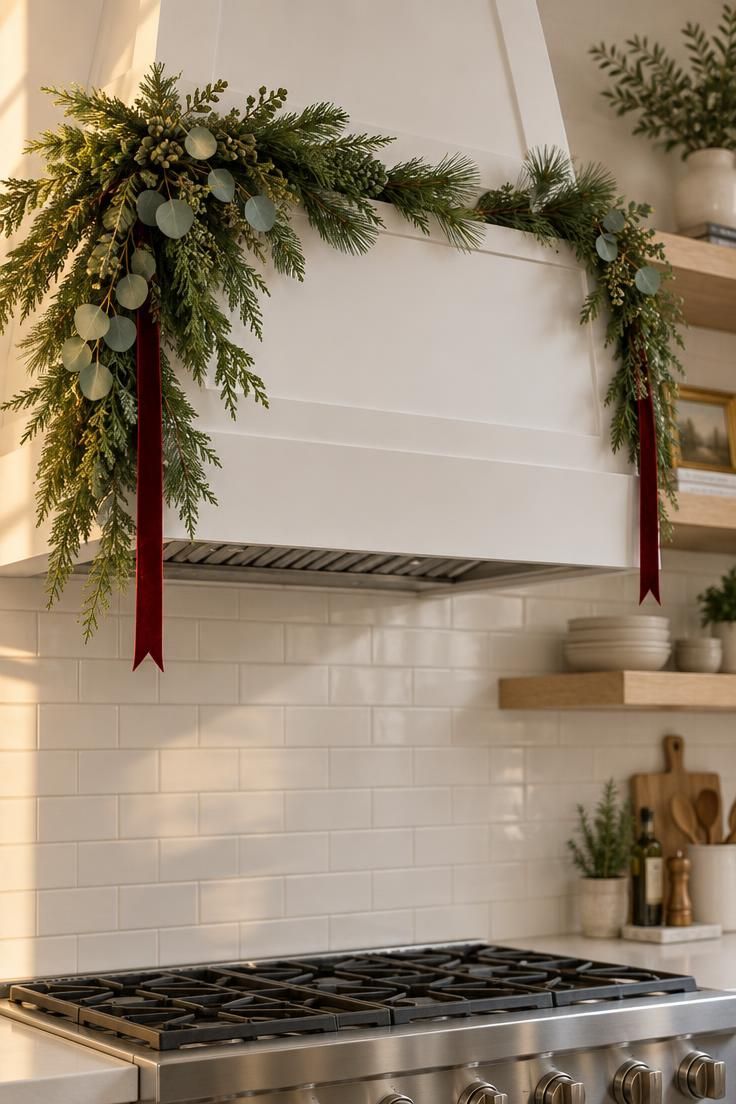
Placing greenery on range hood surfaces puts the holiday layer high in the room, where it reads from the doorway and stays out of cooking space.
A curved swag that dips at the corners and leaves the center open looks more relaxed than a straight line of garland.
Ribbon tails at each side finish the look with less bulk than a full bow.
The practical benefit is distance from steam and splatter.
Grease and moisture rise with cooking, so keep the greenery clear of the cooking zone and the heat of the cooktop.
Faux greenery should not sit where it could contact a heat source or open flame.
A swag draped across the upper front and corners, well above working height, suits a kitchen where the hood is mostly a backdrop.
Choose mixed evergreens over a single type.
Cedar, pine, and eucalyptus together photograph with more depth because the leaves differ in size and finish.
A matte red velvet ribbon flatters white cabinetry; a shiny satin would compete with the metal.
Dust and airborne grease will dull faux foliage over the season.
A monthly wipe with a barely damp cloth, working from the base of each sprig outward, keeps it presentable.
Store the swag flat in a long box to preserve its curve.
This idea belongs to kitchens with a defined hood shape.
On a hood with a flush, flat face, a swag can look glued on unless it has enough volume to drape naturally.
Balance the quantity of greenery to the width of the hood: a narrow hood looks buried under a heavy swag.
Style Blueprint:
- A mixed cedar, pine, and eucalyptus faux swag
- Narrow matte red velvet ribbon for the side tails
- A hood with a defined ledge or crown to support the drape
- A flat storage box for the off-season
Design Pro-Tip: Before hanging a swag, lay it across the hood unsecured and step back to the doorway; adjust the dip and asymmetry there rather than from close range.
Small Boxwood Wreaths on Upper Cabinet Doors
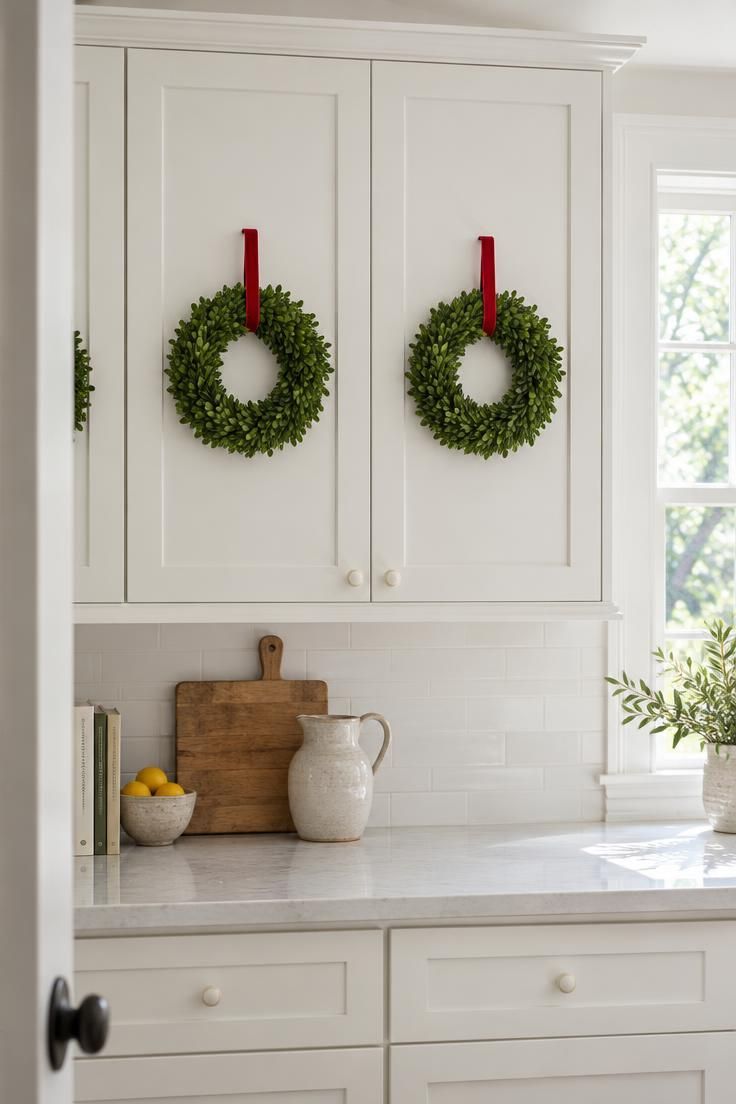
Wreaths on kitchen cabinets work best as a restrained repeat.
Two to four small boxwood wreaths along one run of upper doors read as a deliberate rhythm; a dozen scattered around the room reads as clutter.
Keeping wreaths to about 10 inches across lets the doors open without the wreaths scraping each other.
Choose doors you open less often.
A pantry door, a cabinet holding serving pieces, or the uppermost doors are good candidates.
Everyday dish cabinets get bumped constantly, and a wreath on a swinging door can knock against the neighbor.
Position matters for longevity.
Doors near the range collect grease fastest, so pick a section of cabinetry away from the cooking zone.
The same goes for doors near the sink, where splashes reach lower panels.
Boxwood suits this repeat because it holds a tight shape and stores flat.
Refresh the ribbon each season if it fades, and fluff the boxwood by hand when it comes out of storage.
Ribbon choice determines whether the wreaths look formal or relaxed.
A narrow flat ribbon in a single red gives a clean line.
Burlap would read rustic and less cohesive against painted cabinetry.
The loop should be simple and easy to slip off.
Watch the counter clearance.
A wreath hanging low on a short upper door over a counter can crowd the space behind the sink or the coffee setup.
Keep the wreath centered on the door face, not hanging into the space below.
Style Blueprint:
- Small boxwood wreaths at around 10 inches across
- Thin red ribbon tied in a simple flat loop
- Upper doors away from the range and sink
- A storage box with tissue to keep the wreaths flat
Hot Cocoa Tray with Mini Tree and Stoneware Mugs
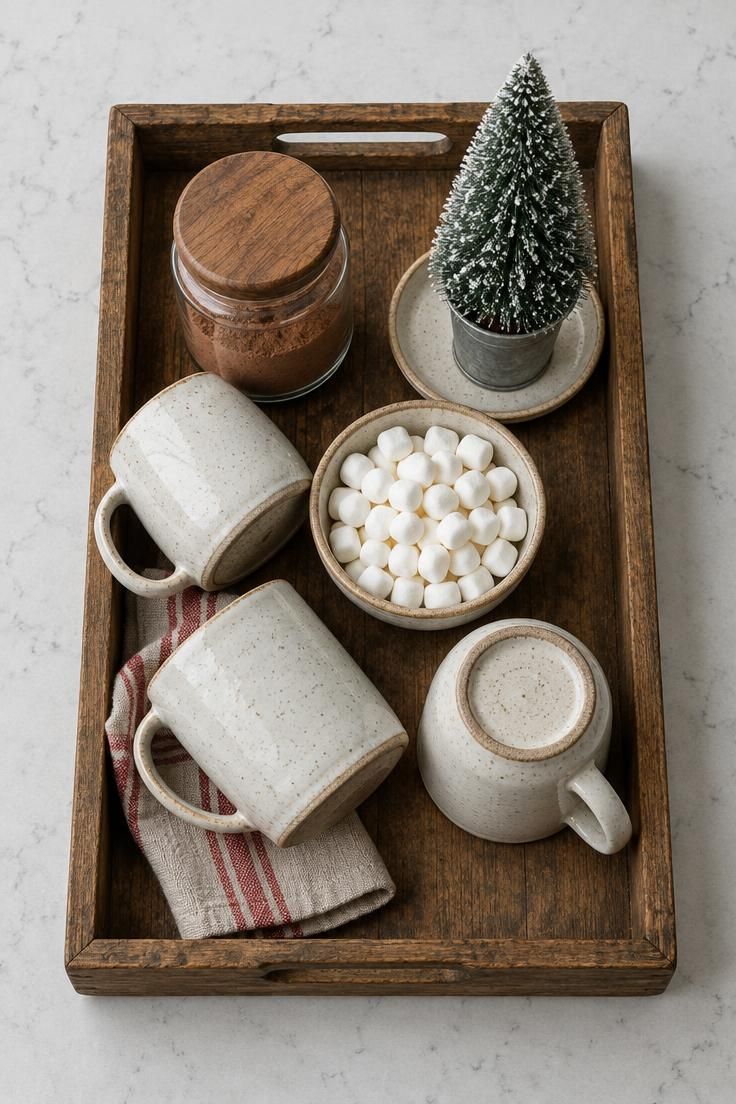
A hot cocoa station tray corrals the seasonal pieces into one movable vignette.
Because the tray lifts as a unit, the counter underneath can be wiped or used for holiday prep in seconds.
That flexibility is what makes this arrangement suit a working kitchen.
Composition depends on a little breathing room.
Leave a visible margin of wood at each end, and let the tallest object, the mini tree, sit off center.
Marshmallows and cocoa belong near the back of the tray so hands reaching for a mug pass over the lower items first.
The mugs do the practical work.
Choose stoneware that can actually take hot drinks and go into the dishwasher.
Keep the cocoa jar covered so steam and splashes from nearby tasks stay out.
Refill marshmallows often through December, since the bowl empties quickly with guests around.
The mini tree should sit on a small saucer or inside a tin, because bristles shed and should not mix with food.
A bright bottle brush in red or green keeps the tray lively against cream ceramics.
If the counter palette is warm, a copper tin for the tree flatters the wood of the tray.
Place the tray well away from the sink and the main prep area.
Check that it does not cover the space you need for a cutting board or a mixing bowl.
A tray roughly 18 inches long is a useful middle size for most counters.
Clean the tray surface between refills, and shake out the saucer so the tree stays tidy.
Style Blueprint:
- A rectangular wooden tray, roughly 18 inches long
- Three dishwasher-safe stoneware mugs
- A lidded glass jar of cocoa and a small bowl of marshmallows
- A mini bottle-brush tree on its own saucer or tin
- A striped linen napkin tucked under the tray edge
Everyday Dishware in Christmas Red on Open Shelves
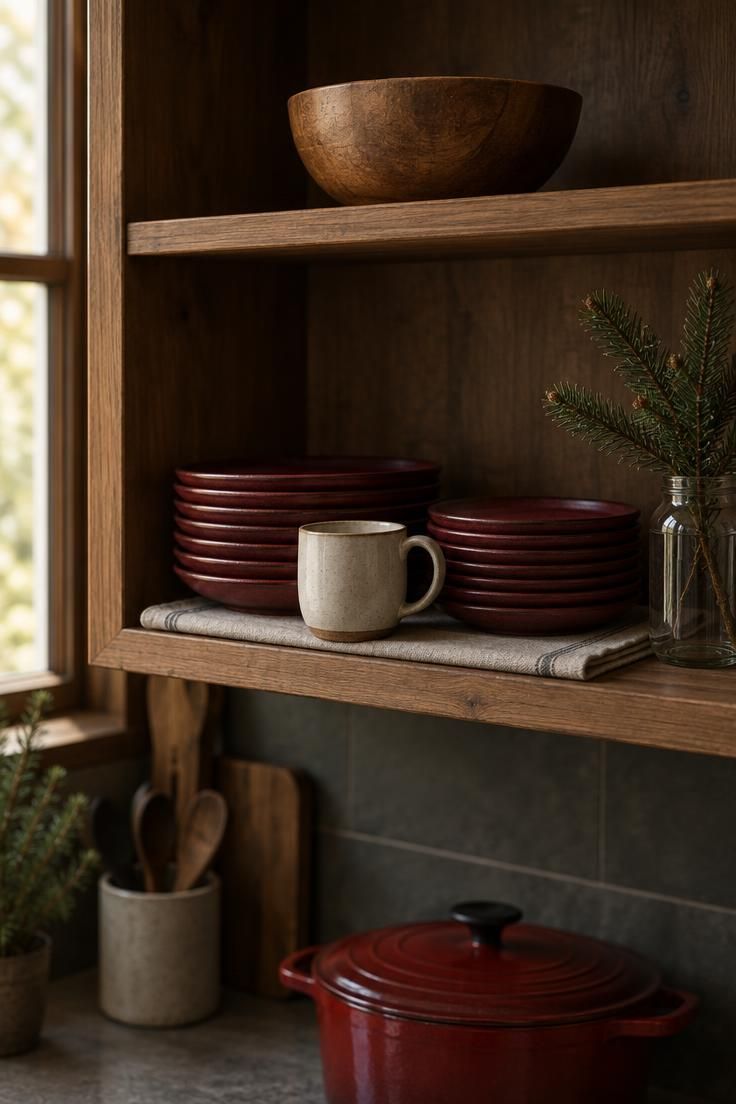
Open shelving gives Christmas kitchen decor a natural platform, and swapping in red stoneware changes the look of the room with almost no effort.
Keep the stacks short, four plates at most, so the red reads as an accent against everyday white or cream.
A single mug in a contrasting tone breaks the repetition.
Sparse styling matters more than a full shelf.
Leave the rest of the shelf empty so the red plates have space to register.
One sprig of faux greenery in a glass jar adds a vertical note without turning the shelf into a still life.
Consider how the shelves are used daily.
This idea suits a shelf that already holds dishes the household actually uses, which makes the decor functional.
Red stoneware that goes straight into the dishwasher after dinner is the easiest version of this look.
Grease and dust find open shelves more readily than closed cabinets, especially near the range.
Wipe the plates and the shelf edges every couple of weeks, and pull the jar of greenery to dust the leaves too.
Red stoneware photographs with more depth than glossy plastic or painted ceramic.
Matte glazes hold the eye and show the subtle variations of a hand-thrown finish.
If the kitchen leans cool, a deeper oxblood red sits more comfortably than a bright tomato tone.
Storage is simple: the plates go back into daily rotation after the holidays or stay out if the household likes the red year-round.
Style Blueprint:
- Dark red stoneware plates stacked four high
- A cream mug in a contrasting tone
- A glass jar with a single sprig of faux greenery
- A folded linen runner under the stacks for texture
- Periodic dusting of the shelf and jar
Bright Red Kitchen Linens on the Island and Towel Bar
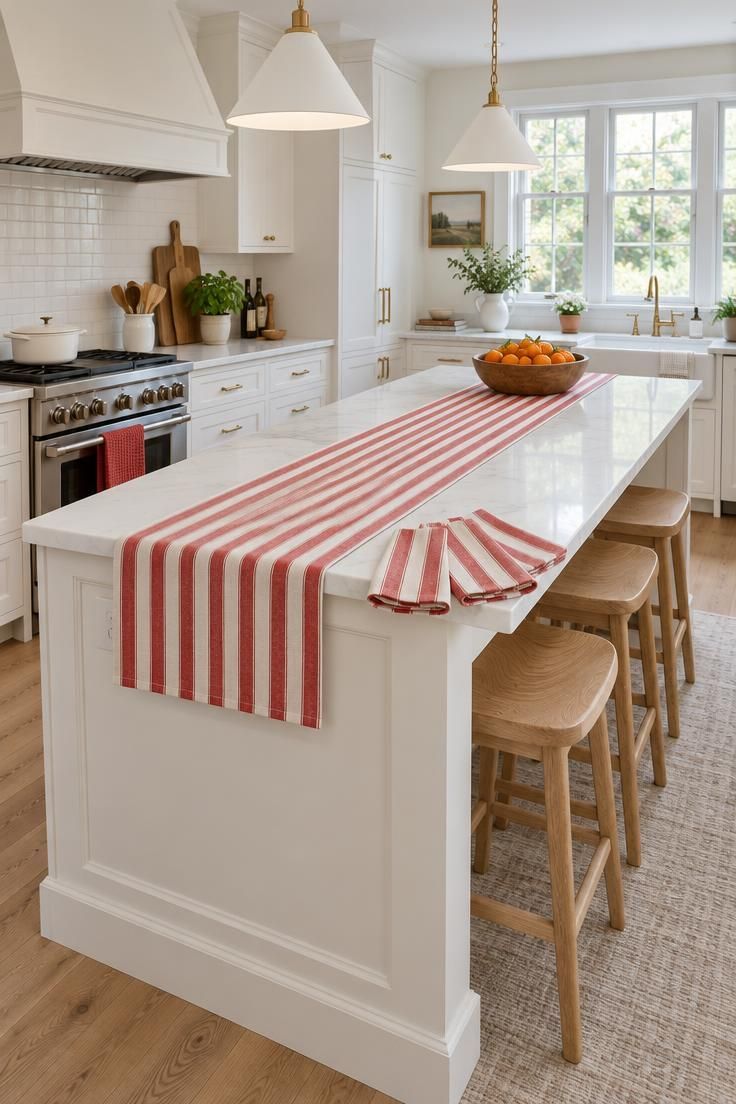
Textiles soften a kitchen's hard surfaces and add pattern at a low cost.
A striped runner on the island creates a visual centerpiece without taking up the prep space in the middle, and matching napkins fan at the seating end so the set looks intentional.
One red towel on the oven bar ties the scheme together.
This idea earns its place because the linens are used.
Napkins go to the table, towels handle spills, and the runner can be washed after a heavy baking day.
Christmas kitchen decor that works alongside real cooking tends to last the season better than fragile arrangements.
Pattern scale is the decision point.
Keep the stripe the same width on the runner, napkins, and towel so the group reads as a family.
Mixing a wide stripe with a narrow check in the same red looks less cohesive.
Aiming for a kitchen island Christmas centerpiece through linens means thinking about placement.
Lay the runner flat and smooth rather than puddled.
Keep any candle or open flame at least 12 inches from the edge of the fabric.
On an island with a cooktop, keep the runner clear of the cooking zone entirely.
Wash the runner and napkins after any splatter, and reserve a second set for the busiest cooking days so the island never looks unkempt.
Style Blueprint:
- A red-and-white striped runner laid lengthwise on the island
- Three matching napkins fanned at the seating end
- A red waffle-weave towel on the oven bar
- A second set of linens for backup during cooking days
Copper Accents and Glass Jars on a Backsplash Shelf
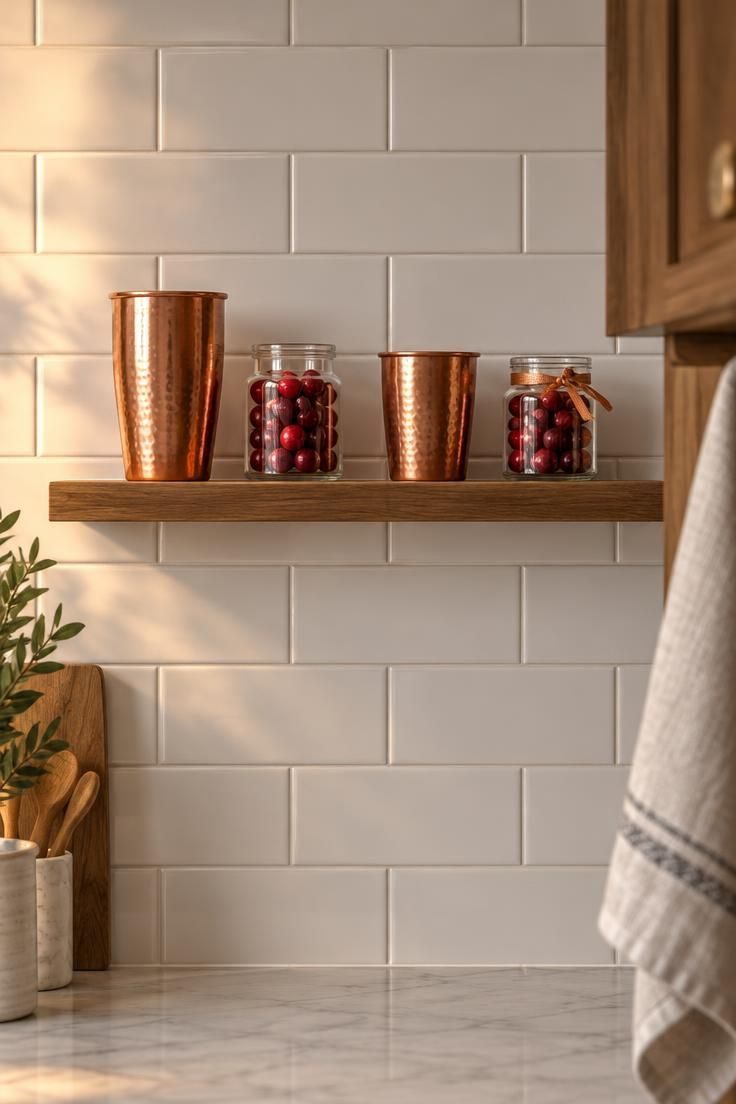
A narrow backsplash shelf lifts decor off the counter and puts it at eye level, where small objects read clearly.
Copper cups against white tile give warmth and shine, and glass jars of cranberries add a translucent red accent.
The shelf stays narrow so it does not intrude on the working depth of the counter.
Alternating heights keeps the line from going flat.
Place the tallest cup between the jars and let the smallest cup sit at one end.
A single ribbon around one jar adds detail without burdening the whole arrangement.
Siting is the main decision.
A shelf placed at least 18 inches from the cooktop avoids the worst of the grease and steam that rise from cooking.
On a tile backsplash, the shelf looks cleanest when it aligns with a grout line or a cabinet edge.
Glass and copper both show fingerprints.
A wipe with a soft cloth whenever the backsplash is cleaned keeps them bright.
The jars can be emptied and rinsed at the end of the season, then refilled next year.
Copper suits both white tile and wood cabinetry, which makes it an easy choice for a kitchen without a strong color direction.
Brass would push warmer; steel would read cooler and more industrial.
A thin copper-toned ribbon picks up the metal of the cups without adding a second visual theme.
Style Blueprint:
- A narrow wood floating shelf about as deep as a coffee mug
- Three copper-tone metal cups in graduated heights
- Two small glass jars filled with red faux cranberries
- One thin copper-toned ribbon tied in a small knot
- A soft cloth kept nearby for fingerprints
Design Pro-Tip: When styling a narrow shelf, hold the cups up before mounting and check the gaps at arm's length; even spacing with one clear gap reads more composed than a dense line of objects.
Small Ornament Ties on Cabinet Knobs and Drawer Pulls
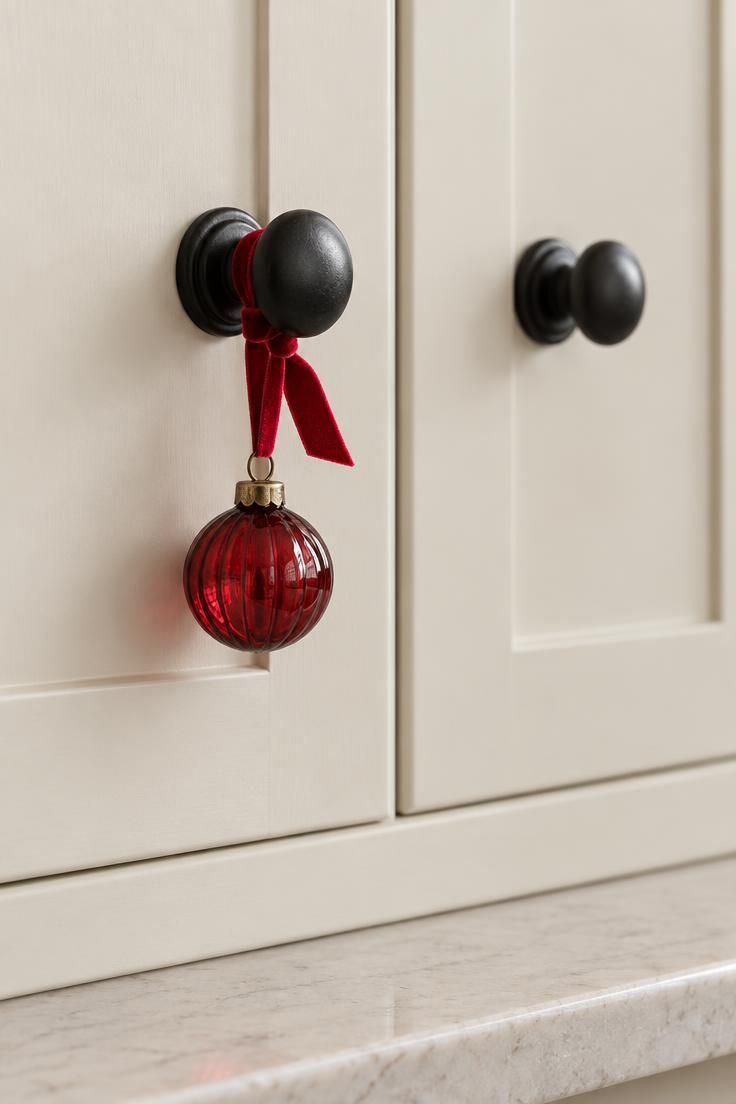
Small ornaments on cabinet hardware give the holiday scheme a subtle repeat that catches the eye at close range.
Scale is everything here: keep each ornament to about two inches across so it hangs as a small jewel rather than a bauble.
Velvet ribbon with a matte finish sits better against painted cabinets than a shiny satin.
Placement decides whether the idea survives daily use.
Choose knobs on cabinets that open no more than once a day, like a sideboard drawer or a bar cabinet.
A heavy-use drawer will knock the ornament against the door front and, eventually, the floor.
Keep water away from the tie.
A knob near the sink risks splashes that dull the ribbon and cloud the glass.
A dark or neutral knob lets the red ornament stand out; bright brass competes with the color and adds a second metallic note.
This is also the easiest place to introduce festive kitchen dishware and linens as a matching theme: a red glass ornament echoes a red towel or a red-striped napkin on the same run of cabinetry, tying the room together with one repeated note.
Tie the ribbon with a simple loop and a short tail, and check that the ornament cannot swing against the cabinet face.
Remove the ties before heavy-use periods or before moving anything through the aisle.
Store the ornaments in a small box with tissue so the glass survives.
Style Blueprint:
- Two small red glass ornaments at about two inches across
- Narrow matte velvet ribbon in red
- Dark or neutral cabinet knobs on low-use doors
- A small tissue-lined storage box
Dried Orange Slices and Cinnamon Bundles in a Glass Cloche
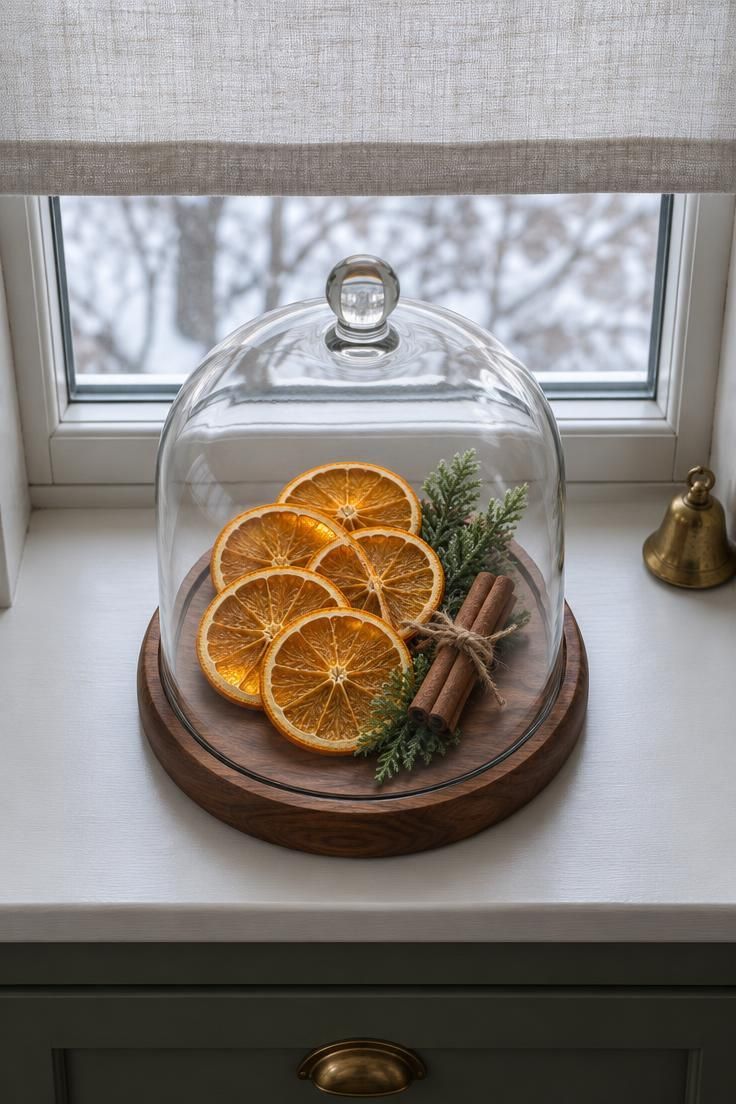
A glass cloche turns a handful of natural materials into a composed object.
Dried oranges, cinnamon sticks, and faux cedar under glass offer color and a dash of texture that suit a kitchen without competing with the room's palette.
The lid also protects delicate pieces from airborne grease and steam.
This arrangement belongs on a windowsill behind the sink, where daylight passes through the orange and lights it from behind.
The base should fit the sill with a little space on each side so window hardware and the shade still move freely.
Air the cloche every few days by lifting the lid for a moment, then replace the cedar when it fades.
Keep the cloche clear of the stovetop, since the glass can heat up near cooking.
Citrus slices can fade over the season; a spare set in a storage jar lets you refresh the arrangement.
Sourcing matters for the look.
A mix of thin and thicker orange slices creates depth, and a cinnamon bundle tied with twine adds a graphic element.
Avoid adding glitter or anything loose that would stick to the glass.
Clean the cloche with a damp cloth and let it dry fully before closing it over the contents.
Store the base and lid separately to prevent scratches.
Style Blueprint:
- A glass cloche with a base around 8 inches across
- Five dried orange slices in a loose fan
- Two cinnamon sticks tied with twine
- A small sprig of faux cedar
- A linen shade and clear window for backlight
Faux Eucalyptus Garland on the Window Valance Rod
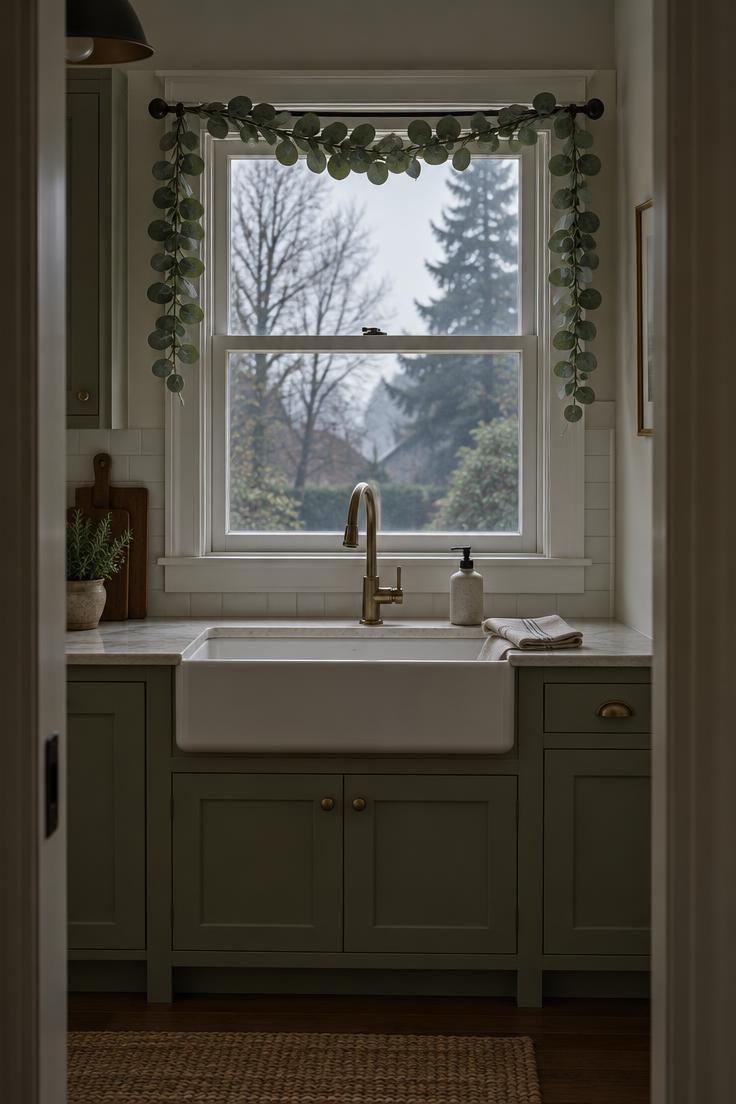
Wrapping a single eucalyptus garland around the window rod above the sink frames the window with greenery and adds height without using counter space.
The pale sage green works well against white cabinetry, and the cool tone feels fresh next to the warm cooking colors around the room.
One garland is usually enough.
A second would cover too much of the glass and cut the light the sink area needs.
Let the ends hang down about ten inches so the frame reads as a swag rather than a curtain.
Function comes first above a sink.
Check that the garland does not cover the window latch or drape onto the faucet.
Use a window that opens by the sash rather than a top hinge so the garland is not disturbed every time the window is opened.
Lint collects on faux leaves near a window.
Vacuum the garland with a brush attachment weekly, and wipe the valance rod when you dust the sash.
Eucalyptus suits a kitchen that leans cool or neutral.
Against honey-toned wood, a warmer green like cedar would sit more naturally.
The matte finish of faux eucalyptus keeps the garland understated compared with shiny or glittered options.
Store the garland loosely coiled in a bag so the leaves keep their shape.
Style Blueprint:
- A single faux eucalyptus garland in cool sage green
- A black metal valance rod for contrast
- A sink window with a sash opening and no latch obstruction
- A brush attachment for weekly dusting
Mini Chalkboard with a Holiday Message on the Backsplash
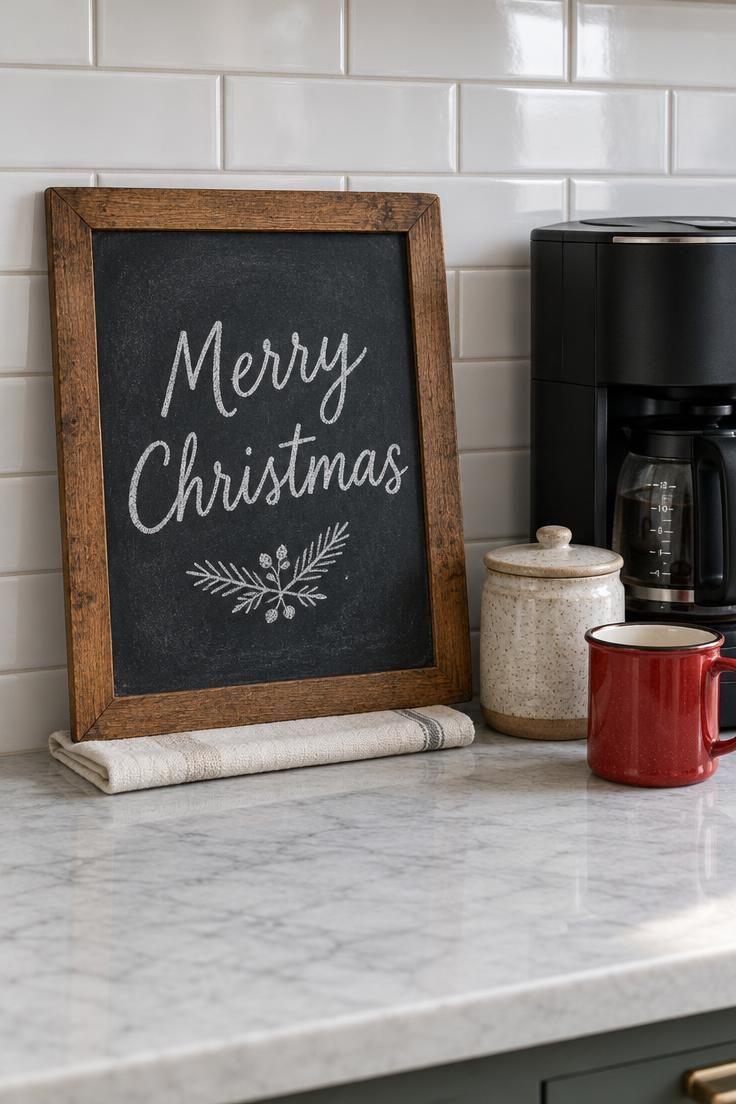
A small chalkboard adds a handwritten note to the kitchen that a printed card cannot match.
Leaning it against the backsplash beside the coffee maker puts the message at eye level during the morning routine, where it is seen every day rather than only on special occasions.
Keep the message short: four words or fewer.
A few large letters read better at a distance than a paragraph.
The board looks best when the chalk strokes are thick and imperfect, with the texture of the board visible through them.
Placement decides its lifespan.
Keep the board at least 24 inches from the range so grease does not settle into the chalk.
A small cloth under the bottom edge catches chalk dust before it reaches the counter.
Erase and rewrite weekly so the message stays fresh.
The frame's finish ties the idea to the room.
A plain oak frame suits warm kitchens, and a white-washed frame blends into pale cabinetry.
A black frame adds a graphic note.
If settling chalk dust feels like one chore too many, a dry-erase board offers the same format with far less mess.
Either way, the board is a seasonal swap that disappears into a drawer after the holidays.
Style Blueprint:
- A wood-framed chalkboard about 10 by 14 inches
- White chalk kept in a small cup or tin
- A folded cloth under the bottom edge
- A spot at least 24 inches from the range
- Weekly erasing and rewriting
Silver-Tone Bells Tied to the Pendant Light Cords
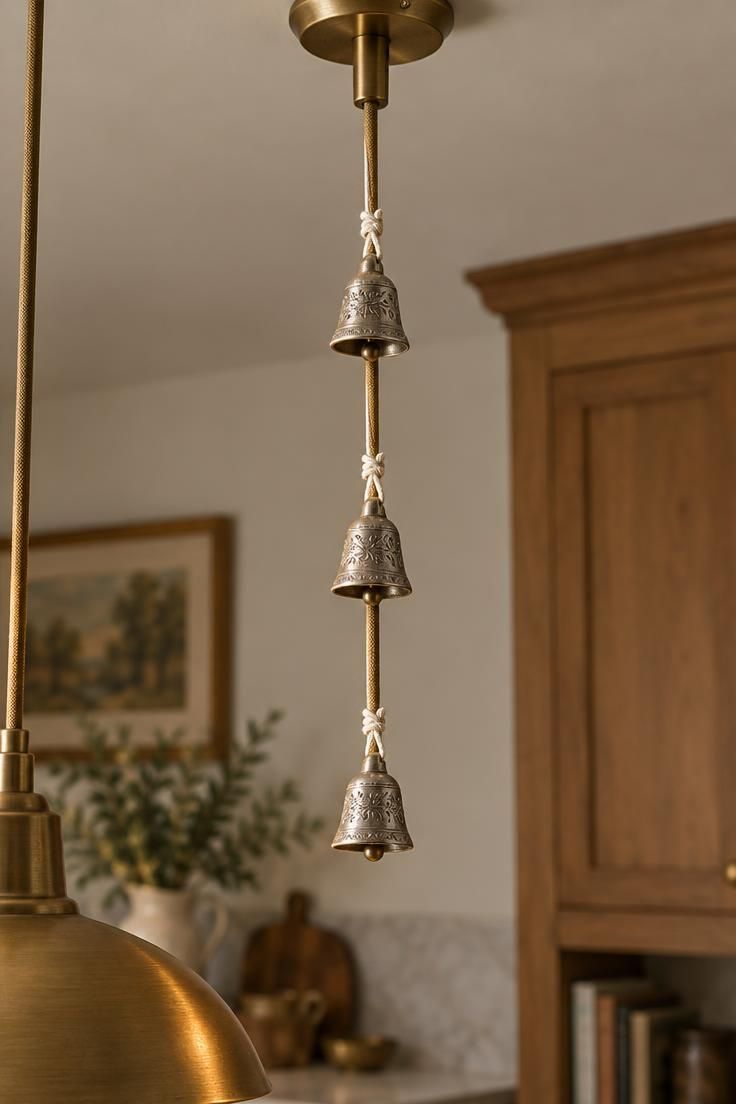
Tiny silver bells tied along a pendant cord give a kitchen a quiet, seasonal detail that reads at eye level over the island.
The scale is small, so the idea stays subtle in person while showing clearly in close focus.
White cotton twine keeps the look simple and lets the bells stand out.
Choose a pendant over an island used for seating rather than heavy cooking so the cord and bells stay clear of steam and splatter.
Space three bells about four inches apart, starting well below the canopy, and check that the lowest bell hangs above head height for anyone walking past.
Metal and cord work together here.
Silver bells against a brass cord create a cool-warm contrast that keeps the fixture from looking too uniform.
In a kitchen with dark metal hardware, the silver reads as a deliberate accent.
This is one place where festive kitchen dishware and linens can echo the bells: a silver-toned serving piece or a white linen napkin on the island repeats the cool-metal note without adding another ornament theme.
Keep the ties light.
More than three bells per cord starts to look like a chime, and the movement of the pendant sends them swinging.
Remove the bells before changing a bulb or doing any work on the fixture.
Store the bells in a small pouch so the etched surface stays shiny.
Style Blueprint:
- Three small silver-tone bells no larger than an inch across
- White cotton twine cut into short lengths
- A pendant over a seating-side island, not a cooking zone
- A small pouch for off-season storage
Conclusion
The best holiday layer in a working kitchen is one you can ignore while dinner is on the stove.
Pick one or two ideas that match the counter space available and the cleaning routine the household keeps, then let the rest of the room stay plain.
Keep the central prep area clear and let the decorated edges do the talking.
After the season, most of these pieces wipe down, pack flat, or nest into a single box until next December.