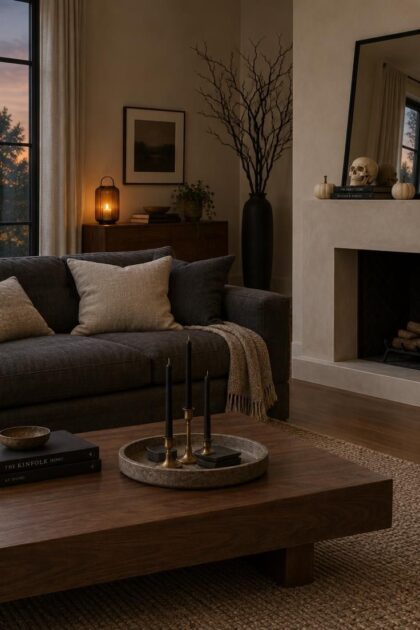
This post may contain affiliate links. If you make a purchase through these links, we may earn a commission at no additional cost to you.
Halloween decorating often means orange plastic, glossy novelty pieces, and a house that looks like a party store for five weeks.
A calmer approach trades volume for restraint: a narrow palette, matte finishes, sculptural shapes, and room to breathe around each object.
The result reads seasonal without overwhelming the rooms you actually live in.
These ideas concentrate on the surfaces guests notice first, the entry, the mantel, the table, and the wall, where a few deliberate choices carry the whole effect.
Each one focuses on what to gather, how to arrange it, and what to watch for in a real home.
Silhouetted Herbarium Specimens in Black-Painted Frames
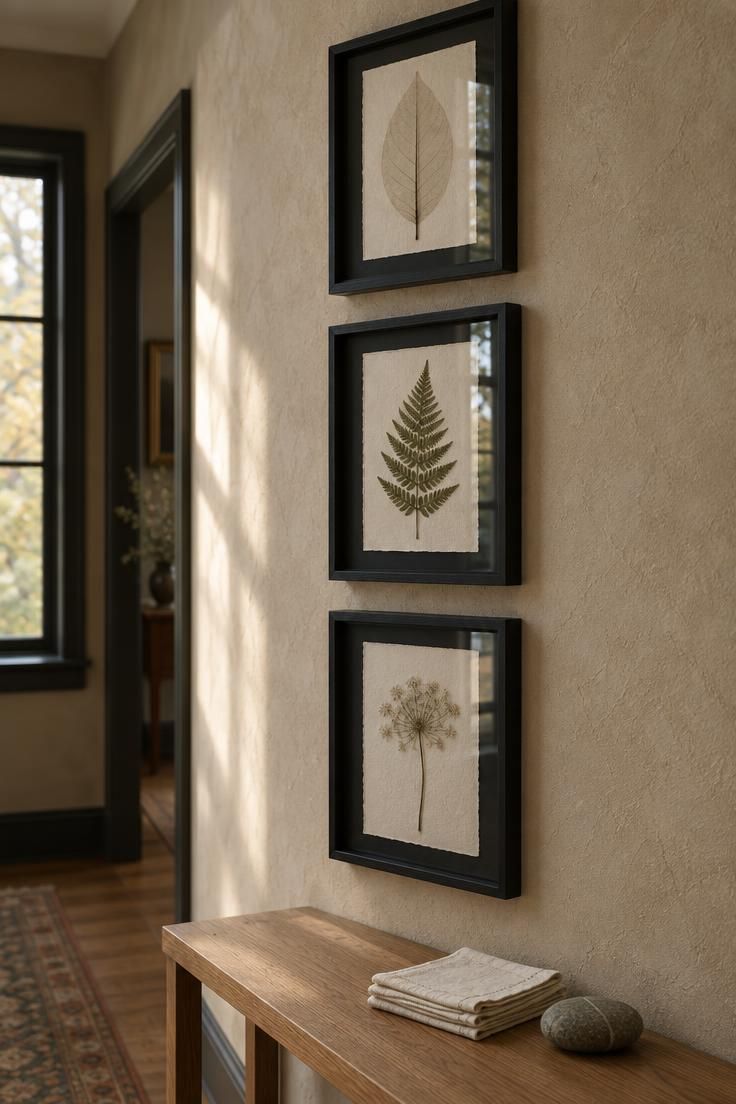
A narrow wall or unused corner becomes a modern curiosity cabinet when you hang a small collection of pressed botanicals in matte black frames.
Choose dried Queen Anne’s lace, fern fronds, or skeletonized magnolia leaves, then press and mount them on off-white cotton rag paper.
The result reads as natural history study rather than seasonal kitsch.
Hang three or five frames in a vertical column along a stairwell or beside a entry console.
Keep the frames identical in width but vary the specimen inside, because repetition of frame shape lets the organic forms stay quiet.
A single black frame around each specimen creates a boundary that keeps the display crisp against warm plaster or pale walls.
Modern Halloween decor often pushes toward dark tabletop objects, but wall-mounted specimens add height without occupying shelf space.
The pressed botanical motif connects to autumn’s fading garden while staying ambiguous enough to remain through November.
Use conservation glass to reduce glare, and choose frames with a deep profile so the botanical sits back from the glass rather than pressing against it.
Real pressed botanicals can become brittle and shift inside the frame.
Mount each specimen with archival linen tape at the stem and central leaf rather than glue over the entire surface, then place the frames where heating vents and direct sun won’t hit them.
Dust frames with a dry microfiber cloth rather than a damp one, since water can enter the frame and stain the cotton paper beneath.
Style Blueprint:
- Three or five narrow matte black frames in a vertical column
- Pressed fern fronds, Queen Anne’s lace, or skeletonized leaves on off-white cotton rag
- Archival linen tape and conservation glass
- A dry microfiber cloth for dusting frame fronts
Renter-Friendly Floating Bat Silhouette Wall
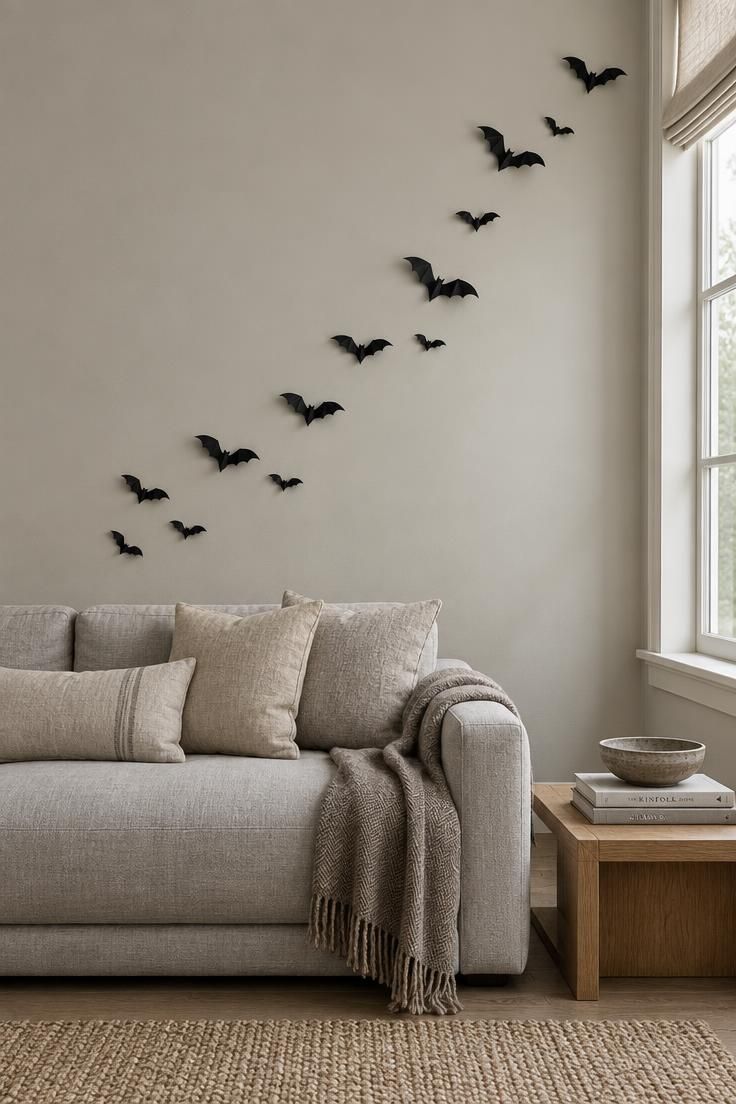
Renter-friendly Halloween wall decor starts with materials that come down as easily as they go up.
Matte black cardstock bats cut or punched from heavy paper give a graphic Halloween read with no paint and no nails, which matters in an apartment or a freshly painted room.
Arrange the bats in a loose rising curve across one wall.
Begin low behind a sofa or console, then let the group drift upward and stop with a few bats near the ceiling on one side.
Spacing should stay irregular: a strict grid belongs to a different idea, while a natural curve looks like a flock in motion.
Attach each bat with a small removable adhesive dot placed near the folded center of the body, then lift the wings slightly so they catch light and cast faint shadows on the wall.
Press gently and firmly at the same time, enough to hold without marking the paint, and peel from the top edge when the season ends.
Keep each bat about the size of a hand.
Larger cutouts need more wall space to avoid looking like wall graphics, and smaller ones disappear above furniture.
Pale walls behind the black paper give the sharpest contrast, and a room with minimal art gives the curve somewhere to travel.
If the wall receives direct sun, check the adhesive after a few warm days, since some dots loosen as they heat.
Paper bats also bend easily, so store them flat in a folder rather than a bag when the season ends.
Style Blueprint:
- Matte black heavy cardstock bats, roughly hand-sized
- A paper punch or pre-cut set in two or three sizes
- Small removable adhesive dots rated for lightweight paper
- A flat folder or envelope for off-season storage
- One wall kept otherwise bare for the curve to read
Modern Halloween Mantel with a Black Mirror and Single Skull
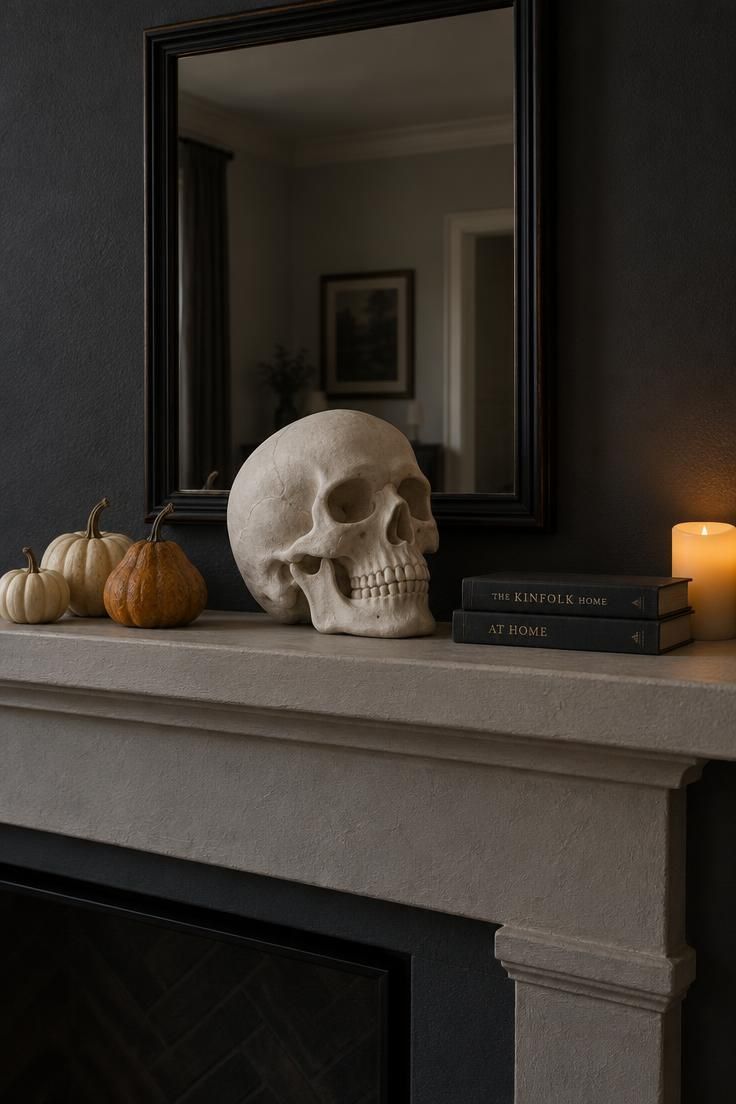
Modern Halloween mantel styling starts with an edited composition and one clear anchor instead of a crowded lineup.
Hang or lean a black-framed mirror in the center, then place an oversized matte ceramic or resin skull slightly off-center in front of it.
The mirror doubles the perceived depth of the display and gives the skull a dark, quiet backdrop.
Add two or three small cream or bone-white pumpkins on one side and a low stack of two books on the other to balance the composition.
A palette of black, cream, and one muted orange accent holds the look together; adding a second bright color usually breaks it.
Height variation matters more than symmetry here.
The mirror provides the tall element, the skull the mid-height focal point, and the pumpkins the low line.
Keep roughly a third of the mantel shelf empty so the arrangement has air around it.
Because a mantel often sits above a heat source, real candles are better replaced with flameless versions near the wall, and dried elements shed onto the shelf and floor over time.
Check the skull and pumpkins for dust, since matte surfaces hold it visibly.
A single matte black decor scheme like this can carry through October and shift into Thanksgiving by swapping the skull for a small gourd.
Style Blueprint:
- Black-framed mirror, rectangular or arched, leaning or hung centered
- One oversized matte ceramic or resin skull
- Two or three small cream or bone-white pumpkins
- A stack of two dark hardcover books
- Flameless candles in warm white for use near the wall
Matte Black Halloween Table Setting with Linen Runner and Charcoal Gourds
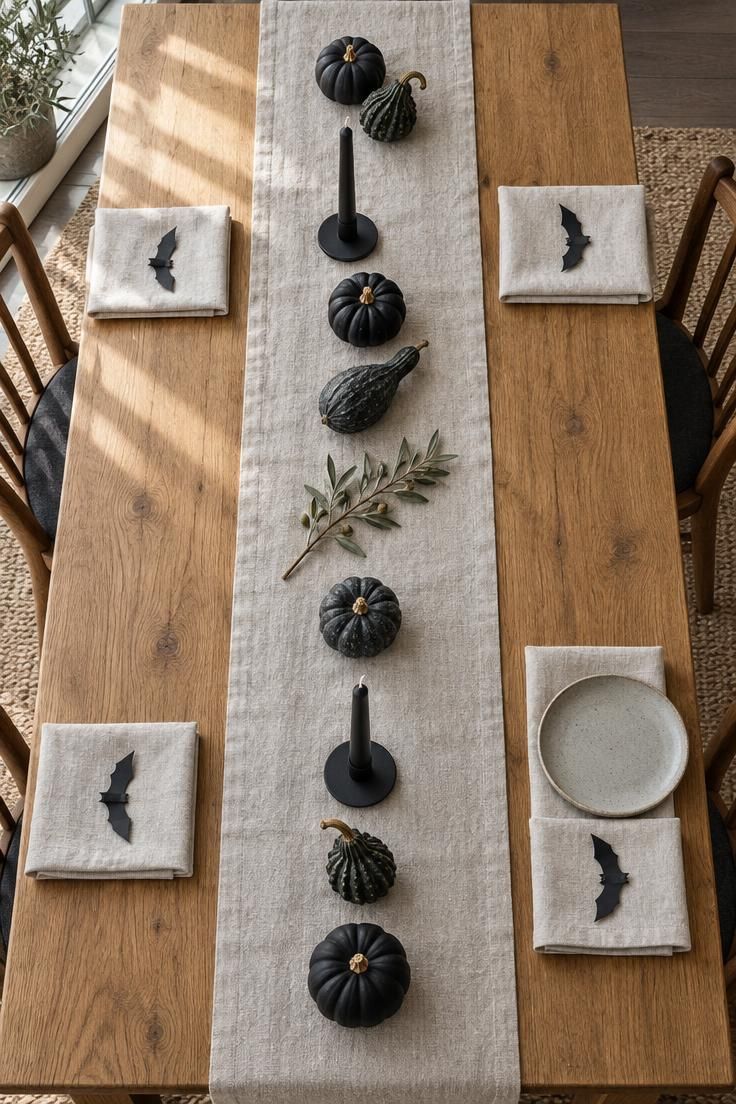
A matte black Halloween table setting works best as a low, linear composition.
Use an undyed or charcoal linen runner down the center of the table, then place small matte black or charcoal pumpkins and gourds at even intervals along it.
Add two or three black taper candles in simple holders, keeping them taller than the pumpkins but still below eye level.
Sightlines across the table stay open, which matters for conversation and for passing dishes.
Repeat a single small motif at each place setting rather than printing the theme onto plates.
A tiny paper bat, a small black ceramic object, or a folded black napkin does the work without adding visual noise.
Cloth napkins in bone or charcoal hold the palette better than printed paper ones.
Some pumpkins are painted, some are naturally dark heirloom varieties, and both read the same at a distance.
If the gourds are real, place a thin liner under each one so moisture never sits directly on the linen or the wood.
Remove the runner after meals so crumbs can be shaken out and spills spot-cleaned while fresh.
For a table used daily, keep the centerpiece to three objects and add the rest only for gatherings.
Matte surfaces and narrow palettes can look flat in low evening light, so one warm light source above the table helps the textures separate.
Style Blueprint:
- Undyed or charcoal linen runner sized to the table
- Five or seven small matte black and charcoal pumpkins and gourds
- Two or three black tapers in low simple holders
- Cloth napkins in bone or charcoal
- Thin liners under any real gourds
Heirloom Pumpkin Arrangement on a Low Pedestal for the Entry
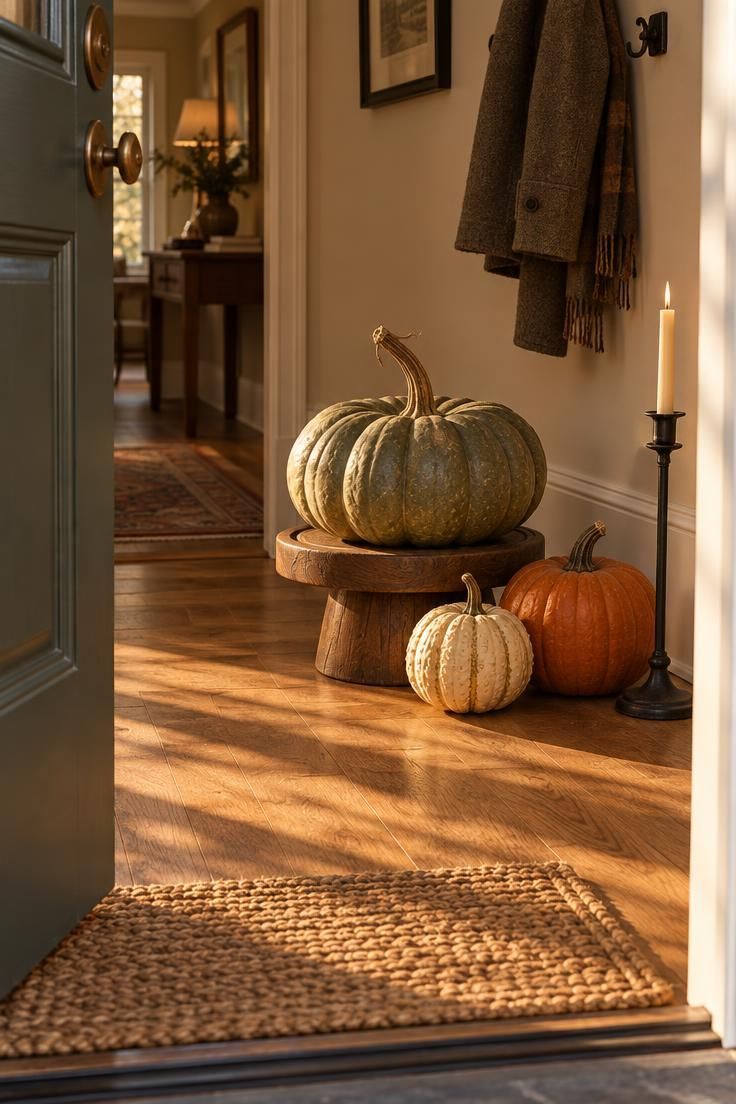
Uncarved heirloom pumpkins in muted colors look sculptural and hold up for weeks, which makes them a natural fit for an entry.
Choose three or five pumpkins and gourds of different sizes, then raise the largest on a low wooden pedestal or a stack of two large books just inside the door.
Place the second-largest beside it and cluster the smallest slightly in front, so the arrangement steps down in height from back to front.
Keep stems intact and turn the most interesting side of each pumpkin toward the room.
Irregular shapes and faded colors are the point here, so avoid picking perfectly round specimens.
A heirloom pumpkin arrangement for entry spaces should stay contained.
Real pumpkins can leave moisture rings on wood, so set a thin liner or a small tray beneath each one.
Check weekly for soft spots and remove any pumpkin that starts to give, since one collapsing gourd can affect the ones beside it.
The size of the entry matters.
In a wide foyer, a large pedestal arrangement fills the space; in a narrow hallway, two or three small gourds on a slim console work better than one big display.
Adding a single black object, a small urn or a matte candlestick, ties the arrangement to the rest of the Halloween scheme without changing its fall character.
Style Blueprint:
- Three or five heirloom pumpkins and gourds in sage, cream, and muted orange
- A low wooden pedestal or two stacked hardcover books
- Thin liners or a shallow tray under each pumpkin
- One matte black accent object nearby
Fall-to-Thanksgiving Decor Transition with Dried Botanicals and Brass
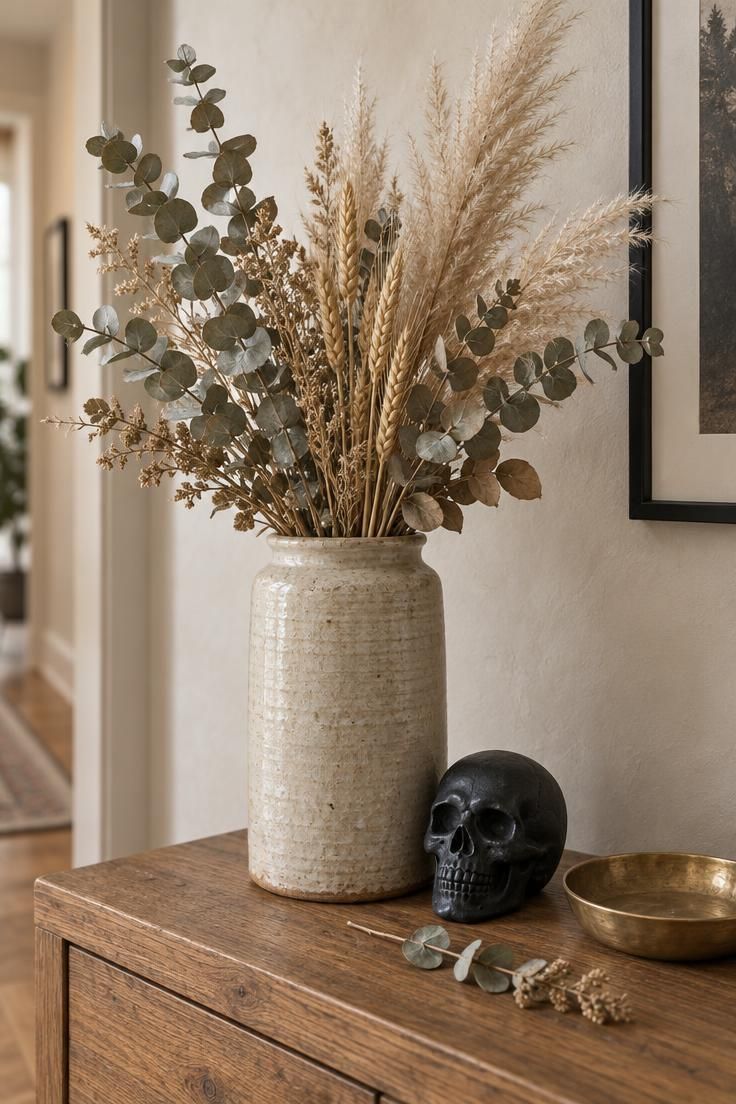
A single vignette that starts as Halloween and ends as Thanksgiving depends on shared materials.
Build a console arrangement with dried eucalyptus, wheat, and a few pampas stems in a stoneware crock, then add one clearly Halloween object, a small ceramic skull or a paper bat, tucked low near the base.
The fall-to-Thanksgiving decor transition works because the bulk of the display is seasonal rather than holiday-specific.
When October ends, remove only the skull or bat and the same arrangement reads as harvest.
Dried stems in wheat tones, sage green, and pale cream pair well with aged brass and warm oak.
Dried botanicals shed, so choose stems that hold their seed heads and place a shallow tray under the crock to catch debris.
Wheat and pampas drop more than eucalyptus, which tends to stay intact.
If the crock is opaque, stem ends stay hidden and the arrangement looks tidy from every angle.
Keep the small Halloween object low and slightly off to one side.
A skull placed at the base reads as part of the composition rather than a separate prop sitting on top of a fall display.
Brass accents, a small bowl or a candlestick, warm the neutral palette and connect the arrangement to the rest of the room.
For a console that stays styled all season, refresh the dried stems once in late October and rotate the display slightly so the same side is not always facing the room.
Style Blueprint:
- Stoneware crock in oatmeal or charcoal
- Dried eucalyptus, wheat, and pampas stems
- One small matte black ceramic skull or paper bat
- A shallow tray beneath the crock
- One aged brass accent, a bowl or candlestick
Black Branch Installation in a Floor Vase Beside the Sofa
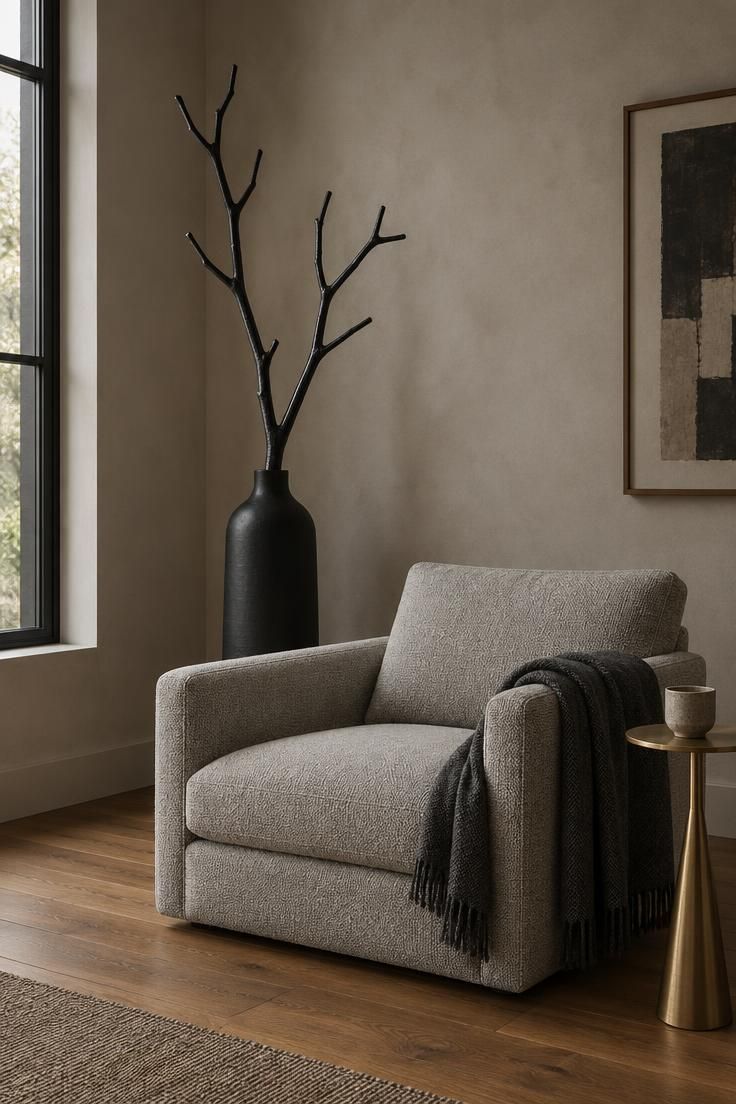
A tall arrangement of black-painted branches in a matte black floor vase creates a quiet, gothic presence in a corner.
Choose one or two branches with interesting forks, then trim them so the overall height reaches roughly two-thirds of the room height.
That proportion keeps the arrangement from overwhelming the space or disappearing against the furniture.
Place the vase slightly behind the sofa or beside a chair rather than dead-center on a wall.
The corner position gives the branches a backdrop and keeps them out of foot traffic.
Because the vase should be opaque, a matte black or dark charcoal ceramic or metal container hides the stem ends and the water line.
This installation works in a large room, where a single tall element fills vertical space that smaller objects cannot.
A smaller apartment often looks better with a shorter branch group in a mid-height vase on a side table, where the same idea reads at a manageable scale.
Dust the branches with a dry cloth rather than a feather duster, which tends to push dust into the forks.
Painted branches can flake if they are handled often, so set the arrangement once and leave it in place for the season.
Style Blueprint:
- One or two black-painted branches with visible forks
- A tall matte black or charcoal floor vase
- A dry cloth for dusting the branches
- A corner position slightly behind seating
Dried Lunaria Wreath with a Single Velvet Pumpkin
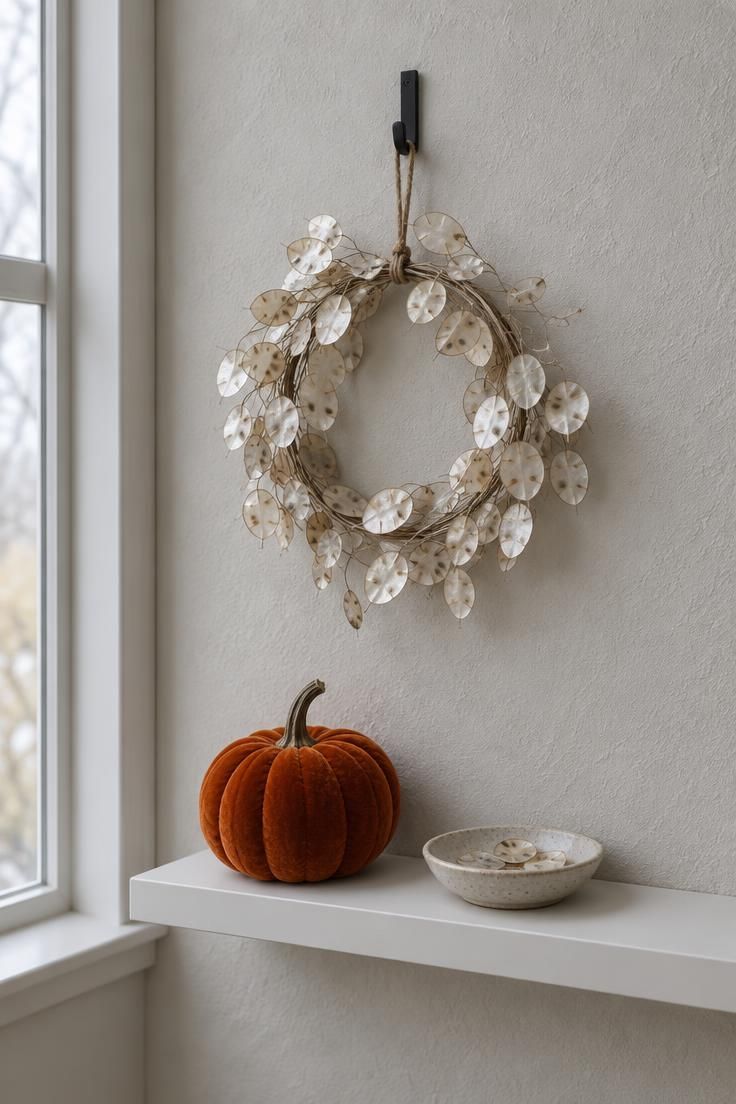
A small wreath of dried lunaria on an interior door or in a wall niche offers a moonlit, semi-transparent texture that pairs well with a matte pumpkin nearby.
Choose a wreath form no wider than a dinner plate, hang it at eye level, and keep the wreath plain.
Adding ribbon, berries, or a second wreath dilutes the effect.
Place one small velvet or matte pumpkin on a nearby shelf or hook as the lone color accent.
A single burnt orange or oxblood pumpkin against pale lunaria gives the composition its one warm note.
Keep the palette around it quiet, with cream, bone, or pale grey surfaces.
Lunaria sheds its seed pods, so place a small tray or dish beneath the wall hook if the floor below is visible.
The wreath itself should hang from a hook or a sturdy removable adhesive rated for its weight, and check it after hanging to be sure it sits flat rather than tilting to one side.
The look works especially well in a hallway, a bathroom, or a small niche where a full mantel display would not fit.
Because the wreath is small and pale, it reads as decoration rather than a seasonal statement, which makes it a good fit for rooms where a heavier Halloween scheme would feel out of place.
Style Blueprint:
- A dried lunaria wreath no wider than a dinner plate
- One small velvet or matte pumpkin in burnt orange or oxblood
- A shallow tray or dish beneath the hook
- A hook or removable adhesive rated for the wreath
Amber Glass Lantern Cluster on a Sideboard
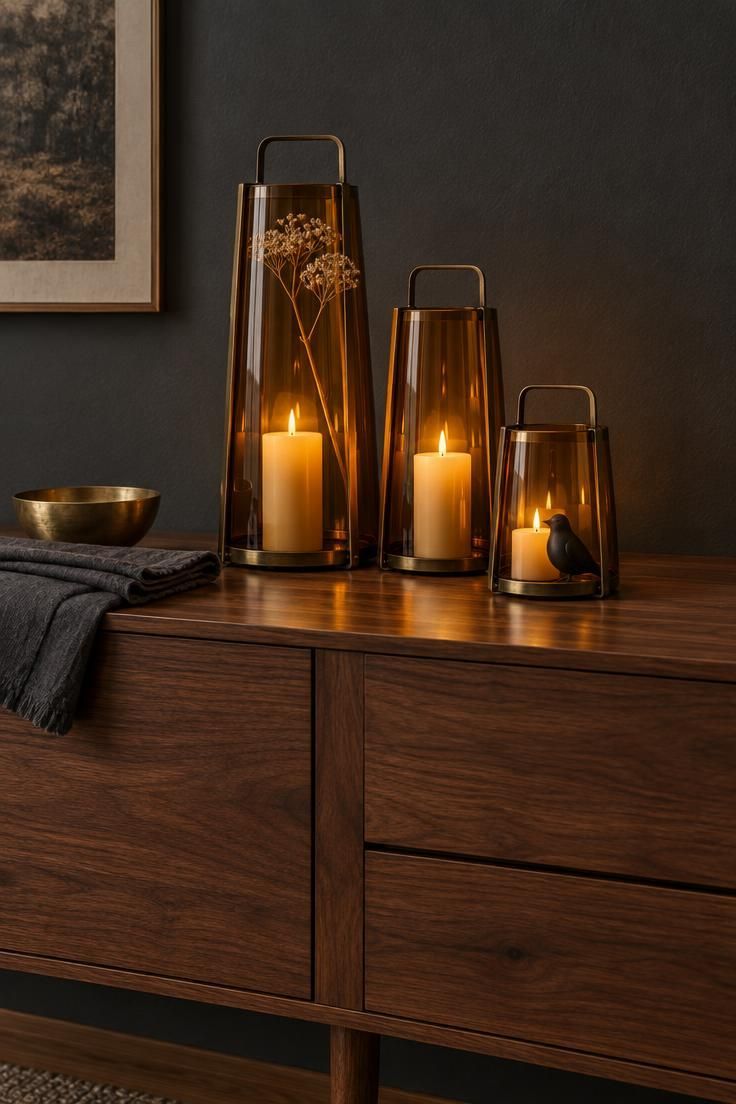
Grouping three or five amber glass lanterns of different heights on a sideboard creates a warm pool of light without switching to orange bulbs.
Start with the tallest lantern at the back left or right, place the second lantern slightly forward, then set a short lantern or low votive at the front.
The staggered line reads as intentional and gives the grouping depth.
Amber glass filters light into a warm, muted glow that suits a dark palette.
Flameless candles in warm white let the lanterns stay lit through a gathering without any open flame near the glass or the wood surface.
Inside the tallest lantern, add one small detail: a single dried stem, a tiny black bird, or a small cream pumpkin.
One object per lantern is enough.
Wipe the glass between uses, since fingerprints and dust show clearly on amber surfaces and dull the glow.
Arrange the cluster so the lanterns sit at least a hand’s width from the sideboard’s front edge, both for stability and to keep cords or candles clear.
On a long sideboard, the lanterns can anchor one half while a bowl or a stack of books fills the other, keeping the arrangement from spreading evenly across the whole surface.
In a small dining room, two lanterns on a narrow sideboard read better than five crowded together.
Style Blueprint:
- Three or five amber glass lanterns in varied heights
- Flameless candles in warm white
- One small object per lantern, a dried stem or tiny black bird
- Microfiber cloth for wiping the glass
- A sideboard or console with room for a second anchor object
Black Velvet Moth Specimens in a Shadow Box Hallway Gallery
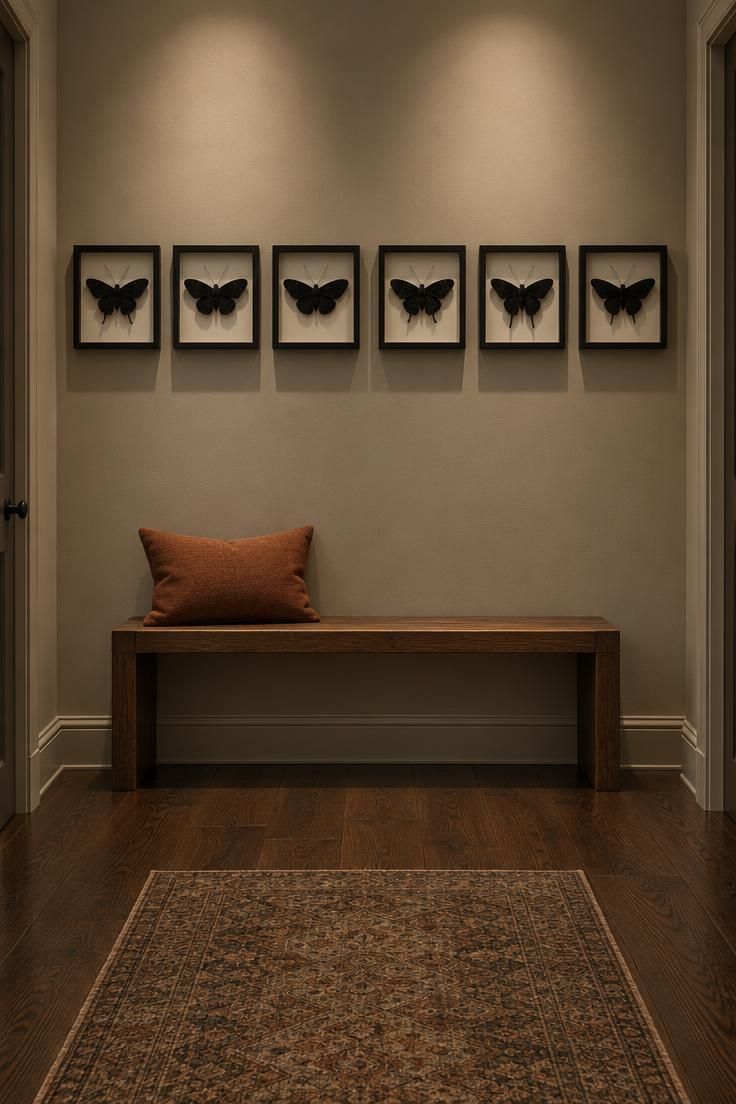
For a moody, museum-inspired approach to Halloween wall decor, mount black velvet moths in shallow white shadow boxes and hang them in a straight line down a hallway.
Unlike paper cutouts applied directly to the wall, the framed specimens feel collected and deliberate, adding depth through layered shadow rather than flat graphic contrast.
Cut simplified moth shapes from black velvet or flocked paper, leaving the antennae delicate but the wings bold enough to read from a distance.
Mount each moth to the inside back of a square shadow box using a small foam spacer, so the wings appear to float just off the background.
A pale warm-white or soft greige back panel keeps the dark velvet visible without the starkness of a bright white box.
Hang five to seven boxes at eye level in a single row, spaced evenly along the longest wall stretch.
In a narrow hallway, shallow frames no deeper than one and a half inches prevent the boxes from obstructing traffic.
The contained format protects the moths from brushing and dust, and each box can be stored flat after the season.
This design works on walls that already hold a console, bench, or low shelving, because the elevated gallery line keeps the arrangement distinct from furniture below.
Avoid placing the boxes near a doorway where a swinging door could knock a frame.
If the hallway receives little natural light, install a dimmable picture light above the row or rely on an existing flush-mount fixture to cast subtle shadows inside each box.
Style Blueprint:
- Five to seven shallow square shadow boxes, black or natural wood frames
- Black velvet moth silhouettes mounted on foam spacers
- A straight hanging line at eye level, evenly spaced
- Pale warm-white or soft greige interior back panels
- Dimmable picture light for low-light hallways
Black Enamel Tray with Waxed Pinecones and a Single Velvet Gourd
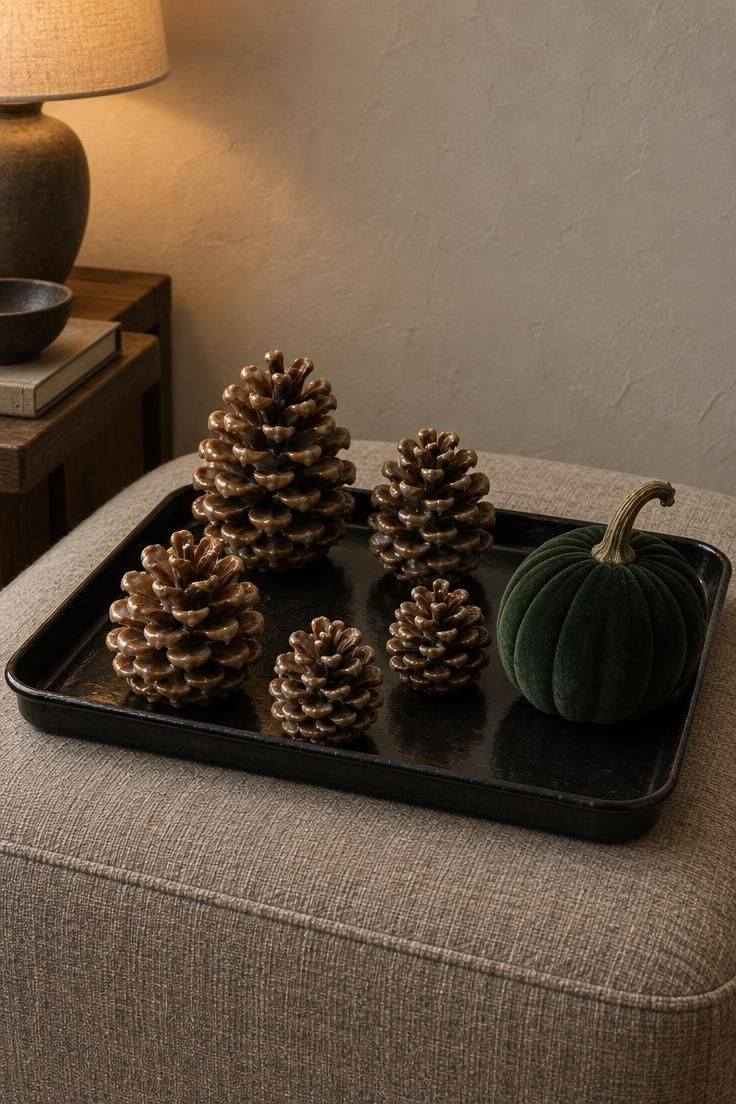
A matte black enamel tray on an ottoman or bench corrals a group of wax-dipped pinecones and one deep green velvet gourd.
The tray gives the arrangement a crisp boundary, so the grouping reads as intentional rather than scattered.
Space the pinecones in a loose grid of three or five, then nestle the velvet gourd at one corner.
The wax coating gives the pinecones a subtle sheen that catches low lamplight, while the soft gourd absorbs light for a quiet contrast.
No additional props are needed.
Use unscented wax or a small amount of clear candle wax brushed lightly over the pinecone scales, and let them cool completely on parchment before placing them on the tray.
If you prefer to skip the wax step, dry pinecones with a faint dusting of matte black spray paint creates a similar quiet effect.
Because the arrangement is low and contained, it works well on a surface that already carries everyday objects, such as a bench at the end of a bed or an ottoman in the living room.
The dark palette keeps the halloween reference subtle, and the organic forms keep the vignette from feeling severe.
Style Blueprint:
- A matte black enamel tray with a low rim
- Three to five wax-dipped pinecones in varied sizes
- One deep green or charcoal velvet gourd
- A low surface such as an ottoman, bench, or low shelf
- Optional faint dusting of matte black spray paint on un-waxed pinecones
Design Pro-Tip: Choose your palette before you shop, then buy only objects that fit it, since editing purchases later is harder than narrowing the list before you start.
Conclusion
Restraint is what ties these ideas together: a limited palette, matte finishes, sculptural forms, and space left open around each object.
The strongest results come from repeating one idea across a few surfaces, not from filling every room.
Start with the entry and the mantel, where guests look first, and let the rest of the house stay close to normal.
When October ends, most of these arrangements shift toward Thanksgiving by removing the skull, bat, or spider and leaving the pumpkins, branches, candlelight, and warm neutrals exactly where they are.